
How to Write Captions and Why they are Important


It is important to write captions because they provide context for a picture and give the reader a who, what, when, where, and why. Captions can go even deeper within the picture by saying how what's happening is happening and leaving the reader with a quote.


When writing captions they can either be Basic or Expanded.


     Basic captions tell…
     - Who (Up to five people with their first ad last names)
     - What 
     - Where 
     - When

     Basic Captions have…
     - An Action Lead-In
     - Basic Information

Basic Captions need to be in PRESENT TENSE and ONE sentence long.

Here is an example:


Smiling for the picture is 3-year-old Jasmine Calixte, Kiera Calixte’s dog who is always bringing her joy is sitting patiently while Kiera takes her picture in their backyard to start the year 2022.


Expanded captions dig deeper and expand coverage by writing more.

    Expanded Captions include…
    - Complimentary Information (How)
    - A Quote

Expanded Captions are written in PAST TENSE and you are adding two sentences to a basic caption (a How and a quote)

 Here is an example:
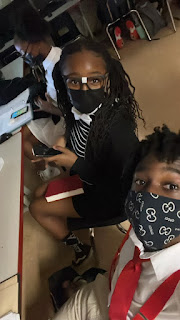
Snapping a picture to capture the moment, Kiera Calixte, Vegas Burnett, and Jordanna Eaves are showing their school spirit at school by participating in nerd day for Plantation High Schools rivalry week for November. They pulled out their suspenders, bow ties, and glasses to pull it all together. “Today was so fun and our outfits looked so good," Jordanna said.


Comments

Popular posts from this blog

Creating a Practice Spread

Around the end of January, I created a practice spread about myself to help me prepare for my final spread for my magazine. Completing this spread helped me get a sense of putting all of my photos, captions, secondary coverage, and article altogether to create something that looks presentable and is completed.   Working on this practice spread helped me experiment with the different ways I could use fonts and colors in my headline, subheadline, and secondary coverage titles. Practice using the three types of spacing (micro, conventional, and macro) came out of making this spread as well. After completing this spread for practice, it helped me realize the things that I need to work on such as having more of a color theme, a better dominant photo, and making sure I can fit my article and captions in their spaces on the spread. Below is a picture of my completed practice spread.

Designing a Table of Contents

Soon after creating my magazine cover, in mid-November, I worked on my table of contents. Many examples of tables of content from famous magazines were provided for me to help me create my own. Here are a few of them… These examples helped me realize that several things needed to be included in my table of contents which was… - A Title - Publishing Information  - Photos - Captions - Margins - Design Elements - White Space - Spacing (Macro, Conventional, and Micro) - Folio

Designing a Layout

By the middle of October, it was time for me to start thinking about the design layout of my magazine. I began to learn about the many different elements of design. This includes pictures, copy and white space, column designs, external and internal margins, placement of the eyeline, dominant photo, copy area, vertical axis, and captions. After that, I started learning about adding more information to my layout by using secondary coverage, how to use micro, conventional, and macro spacing, and the importance of visual/verbal connections which involves the headline and dominant picture. In early November, I began to study fonts. I completed an assignment where I chose five different types of secondary coverage and then I explained how the different font I chose for each secondary coverage would add contrast, where the text will be placed, how drop and raised caps would be used, if transparency and text-wrapping will be used, and the aligning of the text. Creating a good headline was the ...